Private Label, White Label, Wholesale partnerships available - EU, USA and UK - Free shipping from €75
Sterile Lab Equipment Workflow: A Practical Guide
Master the sterile lab equipment workflow to ensure reliable results. This practical guide covers everything from setup to sterilization. Read now!
TL;DR:
- Maintaining a structured, documented sterile workflow is essential to prevent contamination and ensure data reliability. Proper execution involves discipline in equipment setup, glove hygiene, airflow management, and environmental monitoring to sustain aseptic conditions. Cultivating a safety-oriented lab culture that values continuous improvement and accountability reduces contamination risks more effectively than equipment upgrades alone.
A contaminated result doesn’t just waste reagents. It wastes weeks. For researchers working with biological agents, peptides, or sterile reconstitution solutions, a well-executed sterile lab equipment workflow is the difference between reliable data and repeated failures. The industry term for this structured approach is aseptic technique, and when it’s integrated into a documented operational framework, it becomes far more than a checklist. This guide walks you through every stage: from setting up your biological safety cabinet (BSC) to post-use sterilization, environmental monitoring, and the common mistakes that silently compromise even experienced labs.
Key Takeaways
| Point | Details |
|---|---|
| Start with documented controls | An Operations Control Programme tied to ISO 14644-5:2025 is the backbone of sustained sterile operations. |
| BSC discipline drives outcomes | Airflow stabilization, deliberate arm movements, and timed purging steps are non-negotiable for contamination prevention. |
| Sterilization method must match material | Autoclaving, dry heat, and chemical sterilants each have validated use cases. Choosing wrong invalidates your cycle. |
| Monitoring proves what practice claims | Environmental data, logs, and trending are the only way to verify your controls are actually working. |
| Human error is the leading failure mode | Training, audits, and workflow automation reduce operator variance more reliably than hardware upgrades alone. |
Sterile lab equipment workflow: prerequisites and setup
Before you touch any equipment, you need a structured preparation framework. In regulated environments, this is formalized as an Operations Control Programme (OCP). The OCP covers requirements, risks, controls, evidence and records, and continuous improvement via reviews and CAPAs, and it must be updated whenever layout, equipment, or workflow changes occur. Think of it as the operational constitution for your cleanroom or sterile area.
The core equipment you need in place before starting any aseptic work includes:
- Biological Safety Cabinet (BSC) or laminar flow workstation: Matched to your hazard class. Class II Type A2 is the standard for most research labs.
- Sterilizer (autoclave): Validated, calibrated, and with current cycle logs.
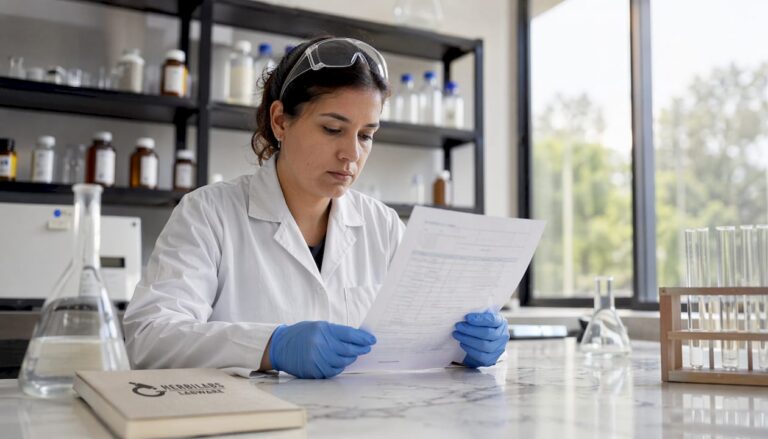
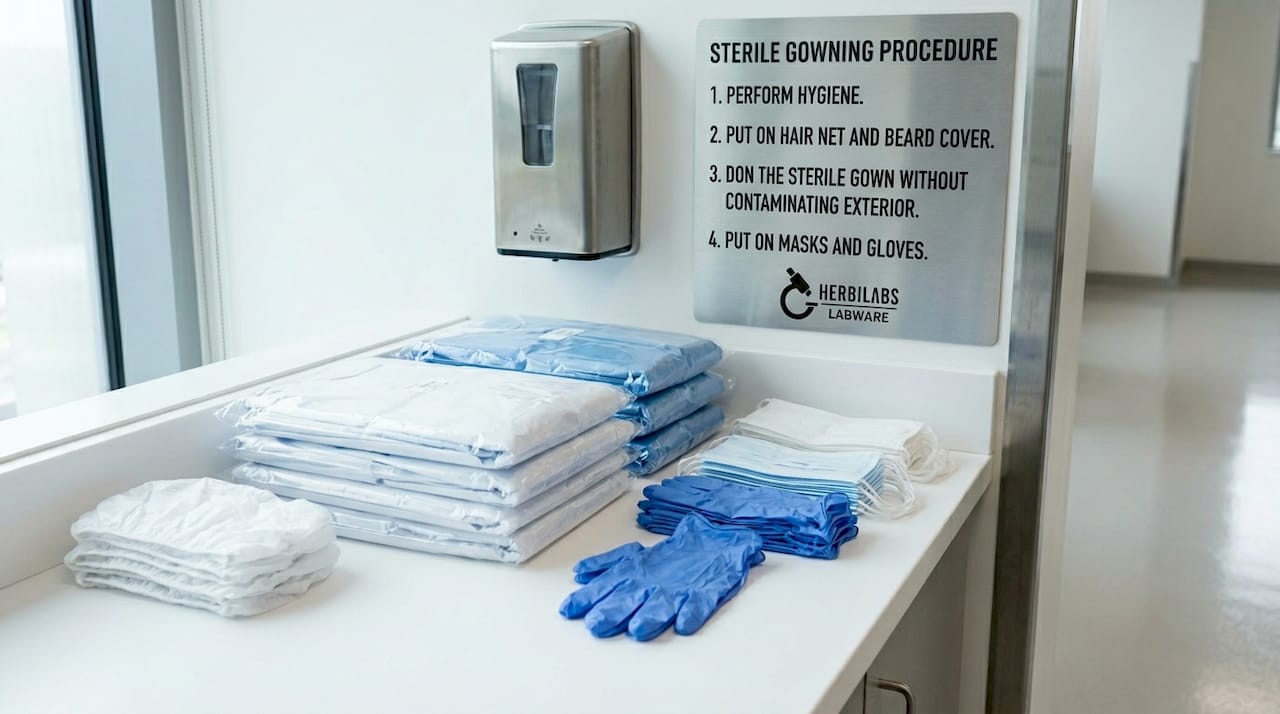
- PPE and gowning: Gloves, gown, mask, eye protection. Sterile outer gloves for direct contact with critical zones.
- Disinfectants: 70% isopropyl alcohol or ethanol, plus a sporicidal agent where required.
- Surface and settle plates: For environmental monitoring before and after work.
Gowning is often where the standard slips. Labs that treat gowning as a formality rather than an aseptic step introduce contamination before the work even begins. Put on PPE in order, outer gloves last, and spray them with 70% ethanol before entering the cabinet workspace.
Pro Tip: Check and log your BSC airflow gauge before every session. If the magnehelic reading is outside the validated range, do not start work. A BSC with degraded filter integrity is worse than no cabinet at all because it creates a false sense of protection.
Your setup checklist should include confirming the sash height is at the marked working position, wiping all interior surfaces with your disinfectant, and then waiting the full contact time before positioning equipment inside the cabinet.
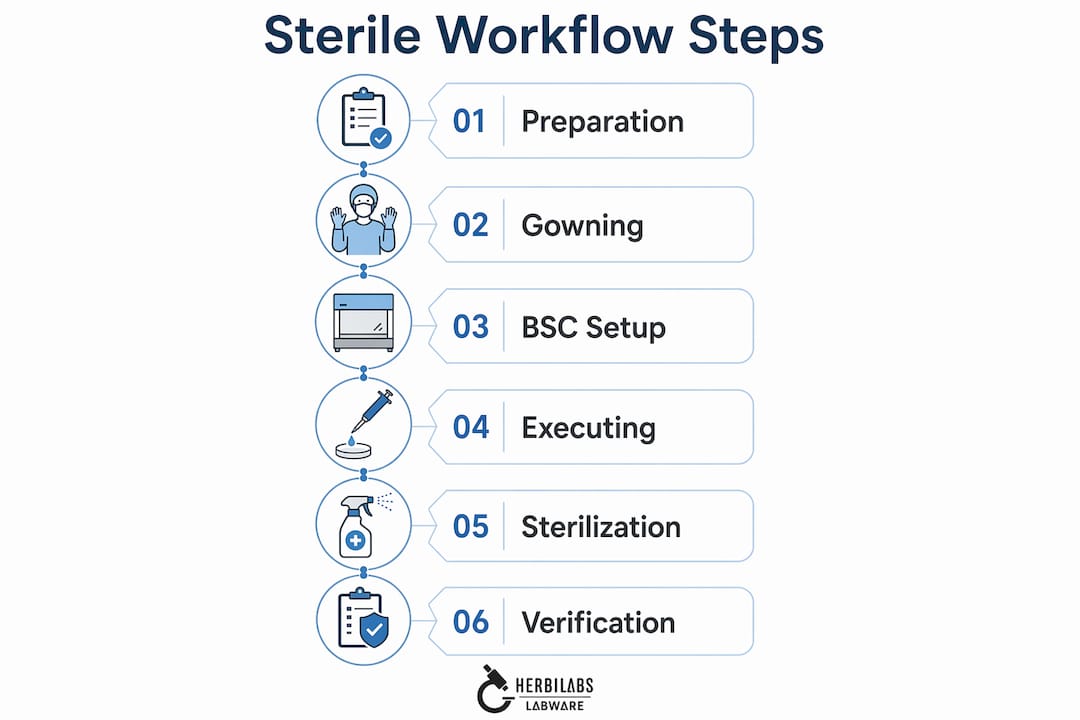
Executing the workflow inside your BSC
Good execution inside a biological safety cabinet is almost entirely about discipline. Proper BSC use depends critically on disciplined behavior and procedural details. Hardware alone cannot prevent contamination.
Follow this sequence every time:
- Run the BSC fan for at least five minutes before work begins. Log the start time. This pre-run purge allows stable laminar airflow to develop and clears any settled particulates from the workspace.
- Wipe all interior surfaces with 70% ethanol. Wait the full contact time, typically two minutes minimum, before placing any equipment inside.
- Decontaminate gloves with 70% ethanol before your hands enter the cabinet. Repeat this step any time your gloves leave and re-enter the work zone.
- Arrange items with a clean-to-dirty progression. Sterile items go at the rear of the cabinet; waste containers, used pipettes, and spent reagents stay toward the front. Never reach across open containers.
- Move your arms slowly and deliberately. Rapid arm movements disrupt the air curtain at the sash opening and pull unfiltered room air into the work zone. This is one of the most underestimated contamination vectors in bench research.
- Keep waste inside the cabinet throughout the session. Removing waste mid-work creates a repeated disruption at the sash plane.
- Run the fan for a post-work purge before removing materials. The post-run purge step reduces settled particulates and prevents aerosol re-entry during transition.
Pro Tip: If you need to answer a question or turn away from the cabinet mid-task, step back before turning. Turning your head while your arms remain inside generates enough turbulence to break laminar flow at the working aperture.
For labs handling bacteriostatic water or sterile reconstitution solutions, a detailed sterile solution handling guide covers how these workflow principles apply specifically to injectable-grade reagent preparation.
Sterilization and cleaning of equipment post-use
Reusable lab equipment can only stay reliable if your sterilization method is matched to the material and your cleaning process is validated. Here is how the three main methods compare:
| Method | Best for | Temperature / Agent | Limitations |
|---|---|---|---|
| Steam autoclave (moist heat) | Glassware, media, heat-stable instruments | 121°C / 134°C, 15-30 min | Damages heat-sensitive plastics and electronics |
| Dry heat oven | Glassware, metal, powders | 160-180°C, 1-2 hours | Longer cycle; unsuitable for rubber or liquids |
| Chemical sterilants (e.g., glutaraldehyde) | Heat-sensitive instruments, surfaces | Concentration and contact time dependent | Requires neutralization; residue risk |
The choice of method is only the start. Washing and rinsing steps before sterilization are equally critical and consistently underestimated. In membrane filtration sterility testing, validated washing steps to remove or inactivate antimicrobial residues are mandatory. Insufficient rinsing is one of the most common causes of false positives in Bacteriostasis and Fungistasis (B&F) testing.
Your post-use cleaning protocol should address:
- Residue removal: Enzymatic detergents for biological material; solvent rinses for chemical residues.
- Material compatibility: Check that cleaning agents do not etch glass, degrade silicone seals, or leach into subsequent preparations.
- Final rinse water quality: Use water-for-injection (WFI) or equivalent for equipment that contacts sterile media or solutions.
- Drying before sterilization: Moisture inside wrapped packs shortens autoclave cycle efficacy.
Calibration and maintenance scheduling belongs here too, not as an afterthought. Autoclaves drift. Temperature and pressure sensors require periodic verification against traceable standards. Document every cycle with a printed or electronic record, and treat any cycle anomaly as a deviation requiring investigation.
Pro Tip: Run a biological indicator (Geobacillus stearothermophilus spore strip) in your autoclave at least monthly. It is the only way to verify that your validated time and temperature combination is actually achieving sterilization at the load’s coldest point.
Verification and monitoring of workflow effectiveness
Executing your sterile laboratory procedures correctly is necessary but not sufficient. You need evidence that they are working. That evidence comes from a structured environmental monitoring program, and it must generate data you can trend over time.
Routine monitoring tools include:
| Monitoring type | What it detects | Frequency |
|---|---|---|
| Settle plates | Viable airborne bioburden | Per session or shift |
| Contact plates / swabs | Surface contamination | Weekly or post-cleaning |
| Active air sampling | Colony-forming units per cubic meter | Per ISO class requirement |
| Airflow velocity measurement | HEPA filter integrity and face velocity | Per calibration schedule |
The EU GMP Annex 1 Contamination Control Strategy requires a documented CCS that links contamination risks to design decisions and monitoring programs. The CCS is not a report you file once. It is a living document that your monitoring data should actively interrogate. When a settle plate result trends upward over three consecutive sessions, that is not background noise. It is a signal that something in the operational workflow has changed.
Documented evidence capture of operation metrics, including logs, trends, and alarms, must be integrated into day-to-day execution to demonstrate sustained control. A BSC usage log that records operator name, session time, pre-run check result, and disinfectant lot number takes less than two minutes to complete and provides traceable evidence if a contamination event occurs.
Staff training and audit frequency are the operational levers most labs underinvest in. A quarterly self-audit against your OCP, with CAPA tracking for any gap, will surface drift in practice before it becomes a contamination event. For labs working with injectable-grade reagents, the contamination control standards applied in pharmaceutical injectable facilities provide a useful reference for the rigor that research environments should be moving toward.
Troubleshooting common mistakes in sterile workflows
Most contamination events in research labs are not caused by equipment failure. They are caused by procedural shortcuts that accumulate unnoticed over time.
The most frequent errors and their fixes:
- Overcrowding the BSC workspace. Too many items block airflow grilles and create turbulence behind equipment. Bring only what you need for the immediate task into the cabinet.
- Treating disinfection as a quick wipe. Effective BSC disinfection requires establishing stable airflow first, applying the disinfectant, and then waiting the full contact time. Starting work immediately after wiping defeats the purpose.
- Ignoring sash height. An open sash above the validated mark breaks the protective air curtain. Most BSC contamination incidents happen at the sash plane, not at the work surface.
- Skipping B&F validation in sterility testing. Sterility testing incubation lasts 14 days with daily turbidity checks. If your membrane filtration wash steps are not validated, you may get a false pass, not because the product is sterile but because the wash inactivated the growth indicators.
- Reactive maintenance culture. SPD performance data shows that treating equipment issues as they arise rather than predicting them leads to measurable increases in defects and workflow disruption.
Workflow automation is worth serious consideration for higher-volume labs. Automation reduces operator variance and documentation gaps, with electronic record support compliant with 21 CFR Part 11.
“The single most underutilized contamination control tool in most research labs is the post-incident debrief. Not a blame session. A structured root-cause review that updates your OCP.”
Pro Tip: Run a quarterly “worst-case” simulation where a new operator performs the full BSC workflow while a senior researcher observes without correcting. The deviations you see are your real standard operating procedure, not the written one.
My take on sterile workflow as infrastructure
I’ve spent years watching labs treat sterile workflows as a compliance obligation rather than operational infrastructure, and that distinction explains most of the contamination events I’ve seen.
The labs that run cleanest are not necessarily the ones with the newest equipment. They are the ones where the OCP is genuinely alive, where monitoring data feeds back into practice, and where staff feel personally accountable for the integrity of the work zone. In my experience, the contamination risk is rarely at the technically complex steps. It sits in the ten seconds before you enter the cabinet when you decide whether to respray your gloves or not.
The emergence of predictive maintenance tools and integrated sterile processing data changes what’s possible. When equipment performance metrics, environmental monitoring trends, and workflow logs feed into a single operational picture, you stop firefighting and start managing.
The hardest lesson I’ve learned is that culture precedes compliance. Write the best SOP in the world, and it will still be undermined by a lab culture that treats sterility as someone else’s problem. Build a culture where every person in the workflow understands why each step matters, and you will rarely need to investigate a contamination event.
— Ragnar
How Herbilabs supports your sterile workflow

The quality of your sterile reagents is as critical as your technique. Herbilabs supplies research-grade bacteriostatic water and sterile reconstitution solutions manufactured to strict purity standards, designed for exactly the kind of demanding workflow this guide describes. If you are working through bacteriostatic water questions about compatibility, dosing, or storage within your sterile setup, Herbilabs has detailed resources built for research professionals. For a foundational understanding of how sterile and bacteriostatic solutions differ in lab application, the bac water vs. sterile water guide covers safe handling decisions directly relevant to aseptic workflows. When your protocol is solid, your reagents should be too.
FAQ
How long should a BSC fan run before starting work?
The fan should run for at least five minutes before any work begins. This pre-run period allows stable laminar airflow to develop and clears settled particulates from the workspace.
What is the most common cause of sterility test failure?
Insufficient washing during membrane filtration is a leading cause. Antimicrobial residues that are not adequately removed or inactivated can inhibit growth indicators, producing false-negative results in B&F testing.
How often should an autoclave be verified with a biological indicator?
Monthly testing with a Geobacillus stearothermophilus spore strip is the standard for most research labs. This is the only reliable way to confirm that your time and temperature combination achieves sterilization at the coldest point of the load.
What does a Contamination Control Strategy actually require?
A CCS must be facility-wide, documented, traceable, and actively linked to contamination risks, design decisions, and operational monitoring programs. Under EU GMP Annex 1, it is a living document, not a one-time filing.
When should gloves be re-decontaminated during BSC work?
Gloves should be sprayed with 70% ethanol before entering the cabinet and every time they leave and re-enter the work zone. Any contact with non-sterile surfaces outside the cabinet requires re-decontamination before resuming aseptic tasks.