Private Label, White Label, Wholesale partnerships available - EU, USA and UK - Free shipping from €75
Safe sterile mixing tutorial: Proven steps for peptide research
Master the safe sterile mixing tutorial to ensure your peptide research is contamination-free. Follow proven steps for success!
TL;DR:
- Even a single contaminated vial can ruin weeks of research and waste costly peptide samples.
- Proper sterile mixing procedures, including tool preparation, environment control, and technique nuances, are essential to maintain solution integrity and safety.
One contaminated vial is all it takes to derail weeks of preparation and waste expensive peptide compounds. For independent researchers and peptide users across Europe, sterile mixing is not a task to approach casually. Errors in reconstitution technique create risks that go beyond wasted reagents: compromised data integrity, unpredictable solution behavior, and potential safety hazards. This guide delivers a methodical, field-tested approach to sterile mixing using bacteriostatic water and research-grade diluents, built on proven reconstitution protocols that address what most basic guides skip entirely.
Table of Contents
- What you need: Tools, materials, and environment
- Step-by-step sterile mixing: Proven safe protocol
- Summary table: Standard vs expert mixing practices
- Troubleshooting and avoiding common mistakes
- Why most sterile mixing tutorials overlook critical lab realities
- Take your lab safety further with proven supplies and guides
- Frequently asked questions
Key Takeaways
| Point | Details |
|---|---|
| Room temperature is essential | Let all liquids equilibrate to room temperature to prevent condensation and contamination. |
| Sterilize and air dry | Always sanitize and allow surfaces and vial stoppers to completely air dry before use. |
| No air injection | Avoid injecting air into vials to prevent contamination from backflow. |
| Slow, wall-directed mixing | Add diluent slowly against the vial wall to safeguard the peptide’s structure and effectiveness. |
| Watch for warning signs | Discard solutions that show cloudiness, floaters, or odd colors, as these may indicate contamination. |
What you need: Tools, materials, and environment
Before you touch a vial, your workspace and materials need to be completely prepared. Cutting corners at the setup stage is the single most common reason researchers encounter problems during or after reconstitution. Think of your prep as the foundation: every step that follows depends on it.
Mandatory supplies
Here is a non-negotiable list of what you need on your bench before starting:
- Sterile peptide vials (lyophilized, sealed, and stored correctly prior to use)
- Bacteriostatic water (0.9% benzyl alcohol preserved, research-grade, sealed vial)
- Sterile syringes (1 mL or 2 mL, single-use, Luer-lock tip preferred)
- Sterile needles (23 to 25 gauge for drawing, finer gauge optional for peptide vials)
- Alcohol wipes (70% isopropyl alcohol, individually wrapped)
- Sterile gloves (nitrile, powder-free)
- Face mask (surgical or FFP2 rated)
- Sharps container for immediate needle disposal
- Permanent marker and labels for vial identification and dating
- Bench liner or sterile mat to create a clean working surface
Recommended additions
| Item | Why it matters | Optional or required |
|---|---|---|
| Laminar flow hood | Filters airborne particles during mixing | Highly recommended |
| Bench disinfectant spray | Secondary surface sanitization | Recommended |
| Sterile transfer caps | Simplifies multi-draw from vials | Optional |
| UV sterilization lamp | Pre-work surface treatment | Optional |
| Digital timer | Tracks air-dry time for alcohol wipes | Recommended |
The workspace itself matters just as much as the tools. Choose a low-traffic room, ideally one you can dedicate to research. Turn off fans or AC units that circulate airborne particles during the mixing window. Lay down a fresh bench liner each session, and apply sterile lab technique basics consistently, not just when you feel it is necessary.
Always read your diluent vials carefully before opening. Check the expiry date, inspect for particulate matter or cloudiness, and verify the crimp seal is fully intact. For bacteriostatic water specifically, confirm the benzyl alcohol concentration is appropriate for your peptide and intended research conditions. Further guidance on lab sterilization tips can help you verify your full setup before you begin.
Proper storage conditions for your reagents matter too. Keep bacteriostatic water at room temperature away from direct sunlight until use. Lyophilized peptide vials typically require refrigeration or freezing, depending on the compound. Never work with vials that have been temperature-cycled excessively.
As the reconstitution guide from Peptidings outlines, you must always use alcohol wipes and ensure all surfaces and tools are sterilized before mixing to prevent contamination. That includes the crimp tops of your vials, your gloved hands before every vial contact, and any tray or surface where equipment rests.
Pro Tip: After wiping a surface or vial stopper with an alcohol swab, set a timer for 30 to 60 seconds. Do not proceed until the surface is visibly dry. Wet alcohol does not sterilize effectively and can introduce solvent directly into your solution.
Step-by-step sterile mixing: Proven safe protocol
With your tools and environment validated, it is time to execute the sterile mixing protocol step-by-step. This sequence is not arbitrary. Each action addresses a specific contamination vector or preservation concern that becomes relevant the moment you breach a sealed vial.
-
Equilibrate your vials. Remove the bacteriostatic water and the peptide vial from storage. Allow both to reach room temperature naturally, approximately 20 to 30 minutes at 18 to 22°C. This prevents condensation forming on cold glass, which can introduce environmental contaminants into the reconstituted solution.
-
Put on your personal protective equipment. Gloves first, then mask. Avoid touching your face, hair, or any unsterilized surface once gloved.
-
Sanitize the workspace. Wipe your bench liner and any tools that will contact vials using fresh alcohol swabs. Allow all surfaces to air dry completely before placing equipment on them.
-
Swab all vial stoppers. Using a fresh alcohol wipe for each vial, clean the rubber stopper on both the bacteriostatic water vial and the peptide vial. Let them air dry. Do not blow on them to accelerate drying.
-
Draw the diluent. Attach a sterile needle to your syringe. Pierce the bacteriostatic water stopper and draw your target volume slowly. Pull back the plunger steadily to avoid drawing air bubbles into the barrel.
-
Introduce diluent to the peptide vial. This is the most technique-sensitive step. Insert the needle into the peptide vial stopper at an angle, and direct the stream of liquid slowly against the inner wall of the vial. Do not inject the diluent directly onto the lyophilized powder cake.
-
Do not shake. Once the diluent is added, remove the needle and gently swirl the vial in a slow circular motion. If the powder does not dissolve immediately, allow it to sit for 2 to 3 minutes and swirl again. Shaking causes foaming and can degrade sensitive peptide bonds.
-
Inspect the solution. Hold the vial up to a light source. The solution should be clear with no floaters, cloudiness, or unexpected color. A fully reconstituted peptide in bacteriostatic water should appear colorless or very faintly tinted depending on the compound.
-
Label immediately. Mark the vial with the peptide name, concentration, date of reconstitution, and your initials. This step is non-negotiable for traceability.
-
Store correctly. Reconstituted peptides in bacteriostatic water typically remain stable for 4 to 6 weeks when refrigerated at 2 to 8°C. Check compound-specific stability data before assuming longevity.
For further context on diluent choice and compatibility, the sterile water reconstitution guide provides excellent background. And if you need a broader framework for managing multiple solutions in a research setting, review safe research solution steps before scaling your workflow.
Safety note: No air injection into the peptide vial and slow wall-directed addition are non-negotiable. Air injection creates backflow contamination risk and disrupts the vial’s sterile internal pressure. Directing liquid against the wall protects peptide structure from mechanical disruption during addition.
Pro Tip: If you are working with a particularly fragile peptide, chill the peptide vial in a refrigerator rather than bringing it all the way to room temperature. A slightly cold vial slows dissolution, but this is a worthwhile trade-off for delicate compounds that denature easily at room temperature.
Summary table: Standard vs expert mixing practices
Having followed the stepwise guide, it helps to see clearly how expert protocol differs from common shortcuts. Many researchers adopt informal habits that feel efficient but introduce real risks to solution integrity.
| Practice area | Common shortcut | Expert protocol | Risk of shortcut |
|---|---|---|---|
| Temperature equilibration | Use vials straight from storage | Equilibrate to room temperature for 20+ minutes | Condensation introduces contaminants |
| Alcohol swab drying | Proceed immediately after wiping | Wait 30 to 60 seconds until fully dry | Wet alcohol enters solution |
| Diluent introduction | Inject directly onto powder | Direct stream against vial wall slowly | Structural peptide damage, foaming |
| Air management | Inject air into vial to equalize pressure | No air injection; use appropriate volume technique | Backflow and contamination risk |
| Post-mixing agitation | Shake vial for fast dissolution | Gentle swirl only, allow passive dissolution | Peptide degradation, foaming |
| Labeling | Rely on memory or informal notes | Label immediately with full details | Traceability failure, dosing error |
| Inspection | Skip visual check | Inspect under light before use | Contaminated solution used unknowingly |
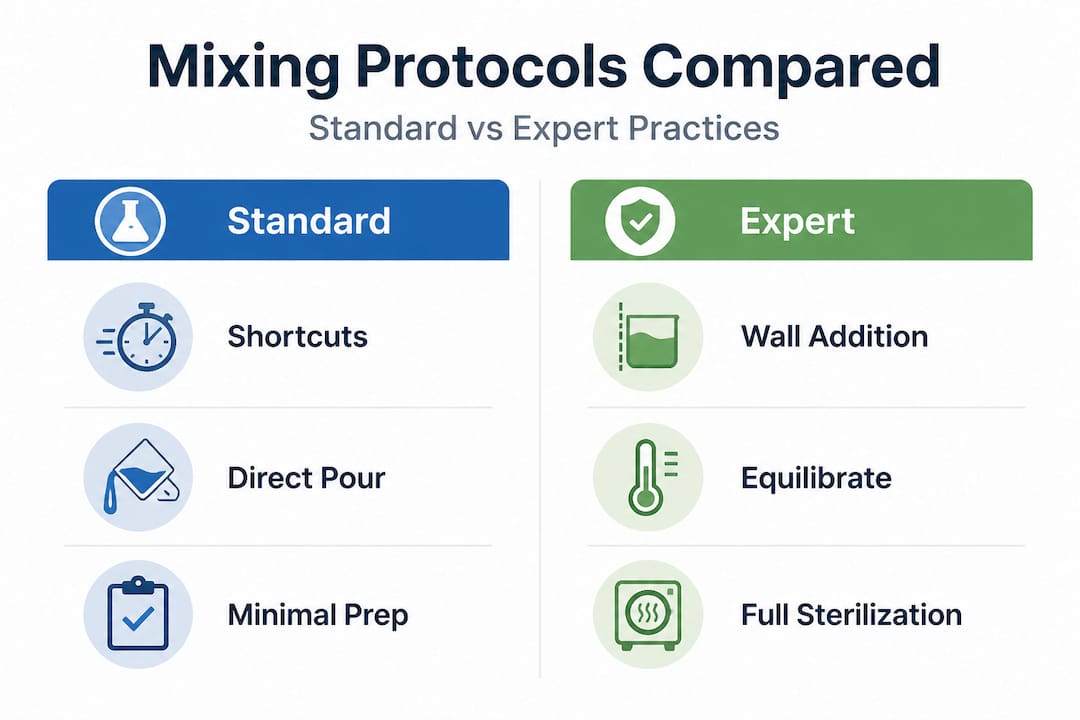
As expert protocol confirms, slow wall-directed addition and no air injection together form the two most critical technical controls. Both protect against contamination and preserve the structural integrity of your peptide compound. For a full breakdown of how contamination enters the lab environment and where it can be intercepted, the avoid lab contamination resource is worth bookmarking as a reference document.
Troubleshooting and avoiding common mistakes
Knowing what can go wrong is crucial for every researcher. Even experienced practitioners occasionally encounter issues. The difference between a novice and a seasoned researcher is often not the absence of problems, but knowing how to read the signs and respond correctly.
Warning signs to watch for
- Persistent cloudiness after complete dissolution time: indicates possible contamination, precipitate formation, or incompatible diluent
- Visible floaters or particulate matter: suggests particulate contamination, degraded compound, or poor vial cleanliness
- Unexpected color change: yellowish or brownish tint in a solution that should be clear may signal oxidation or microbial growth
- Foam that does not resolve: usually caused by shaking or too-rapid diluent injection
- Incomplete dissolution after extended swirling: may indicate insufficient diluent volume, temperature mismatch, or compound degradation
Corrective actions
For cloudiness or floaters, do not attempt to filter or salvage the solution. Discard immediately and repeat the process with fresh materials, identifying where the protocol failed before proceeding. Condensation, incomplete dissolution, and cloudiness all trace back to specific protocol errors that are identifiable with careful review.
For foam that does not resolve, allow the vial to sit undisturbed for 5 to 10 minutes in a refrigerator. If foam persists, the solution quality is likely compromised and reconstitution should be repeated.
For incomplete dissolution, try increasing the diluent volume slightly or returning the vial to room temperature if it was too cold. Never heat the vial. Some peptides simply require more time and patience.
For contamination control strategies that go beyond the mixing step itself, including environmental monitoring and vial handling protocols, the contamination control tips resource addresses the full workflow. And for guidance on how to store reconstituted solutions correctly to extend their usable window, lab storage and safety provides clear, compound-specific direction.
Pro Tip: Keep a simple mixing log for every reconstitution session. Record the date, peptide compound, lot number, diluent type and volume, any anomalies observed, and storage location. This habit creates an invaluable traceability record and will help you quickly identify patterns in any repeated issues.
Why most sterile mixing tutorials overlook critical lab realities
Here is an opinion that may be uncomfortable to hear: most sterile mixing tutorials are written for liability protection, not for actual laboratory success. They cover the basics because covering the basics cannot be criticized. But the basics alone are not enough.
The details that genuinely separate a reliable reconstitution from a compromised one are almost always the micro-steps. The 30-second air-dry after an alcohol wipe. The angle of the needle during diluent introduction. The decision not to inject air to equalize vial pressure. These are the kinds of nuances that do not appear in a three-paragraph tutorial because they require explanation, context, and a reader willing to slow down and understand the reasoning.
The researchers who develop truly reliable technique are the ones who ask why at every step. Why does the alcohol need to be dry? Because isopropyl alcohol is not bacteriostatic at diluted concentrations, and wet alcohol on a stopper creates a solvent bridge into your vial. Why no shaking? Because many peptide bonds are physically fragile under mechanical stress, not just thermally sensitive. Understanding the mechanism behind each rule transforms protocol compliance from a checklist into genuine expertise.
For European independent researchers working outside of institutional lab environments, this matters even more. Without colleagues or supervisors to catch technique errors, your only defense is deep procedural understanding. Resources focused on ensuring lab purity can help bridge that gap, but no resource replaces genuine comprehension of why each control exists.
Protocol discipline at this level is not perfectionism. It is the minimum standard required for reproducible, trustworthy research.
Take your lab safety further with proven supplies and guides
Technique and supplies are inseparable. The most disciplined protocol in the world still depends on research-grade materials that meet the purity standards your work demands.

At Herbilabs, we supply bacteriostatic water and sterile diluents manufactured under strict quality controls, specifically for the peptide research community across the UK and Europe. Whether you are building your first reconstitution workflow or optimizing an established research process, our resources and products are designed to support both. Explore our bacteriostatic water FAQs for answers to the most common diluent questions, compare options using our bacteriostatic vs. sterile water guide, and browse our selection of reliable peptide labware to ensure every component of your workflow meets the standard your research requires.
Frequently asked questions
Why should bacteriostatic water be brought to room temperature before mixing?
Bringing it to room temperature prevents condensation from forming on cold glass surfaces, which can introduce environmental contaminants and reduce reconstitution efficiency. The equilibration step is simple but frequently skipped.
What is the best way to add diluent to a peptide vial?
Add the diluent slowly, directing the stream against the inner wall of the vial rather than directly onto the powder. This wall-directed addition protects peptide structure and reduces foaming significantly.
Is it necessary to let alcohol swabs air dry before piercing vial stoppers?
Yes, always. Wet isopropyl alcohol does not sterilize as effectively as dry alcohol, and an undried stopper risks introducing solvent into your solution. Fully air-drying the swabbed surface takes less than a minute and is not optional.
What signs indicate a failed sterile mixing attempt?
Persistent cloudiness, visible floaters, or an unexpected color change are the primary indicators. Each of these points to either a contamination or protocol error that requires discarding the solution and restarting from scratch.