Private Label, White Label, Wholesale partnerships available - EU, USA and UK - Free shipping from €75

Lab Reagent Verification Workflow: 2026 Guide for Labs
Discover the essential lab reagent verification workflow for 2026. Ensure quality, compliance, and reliable test results with our comprehensive guide.
TL;DR:
- A lab reagent verification workflow ensures each new reagent lot meets quality standards before testing. It relies on proper documentation, personnel training, and calibrated equipment to maintain compliance and data integrity. Implementing risk-based QC tiers and following protocols like CLSI EP26 enhances reliability and prevents costly errors.
A lab reagent verification workflow is a systematic process that confirms each new reagent lot meets defined quality and consistency standards before it enters scientific testing. Without this process, test results become unreliable, and reagent inconsistencies can directly compromise patient care and research outcomes. Industry standards from CLSI and ISO/IEC 17025 treat verification as a mandatory step, not an optional one. Labs that skip it risk failed audits, regulatory citations, and data that cannot be defended. This guide walks you through every stage of the process, from prerequisites to troubleshooting, using current protocol guidance and risk-based thinking.
What prerequisites are needed for a lab reagent verification workflow?
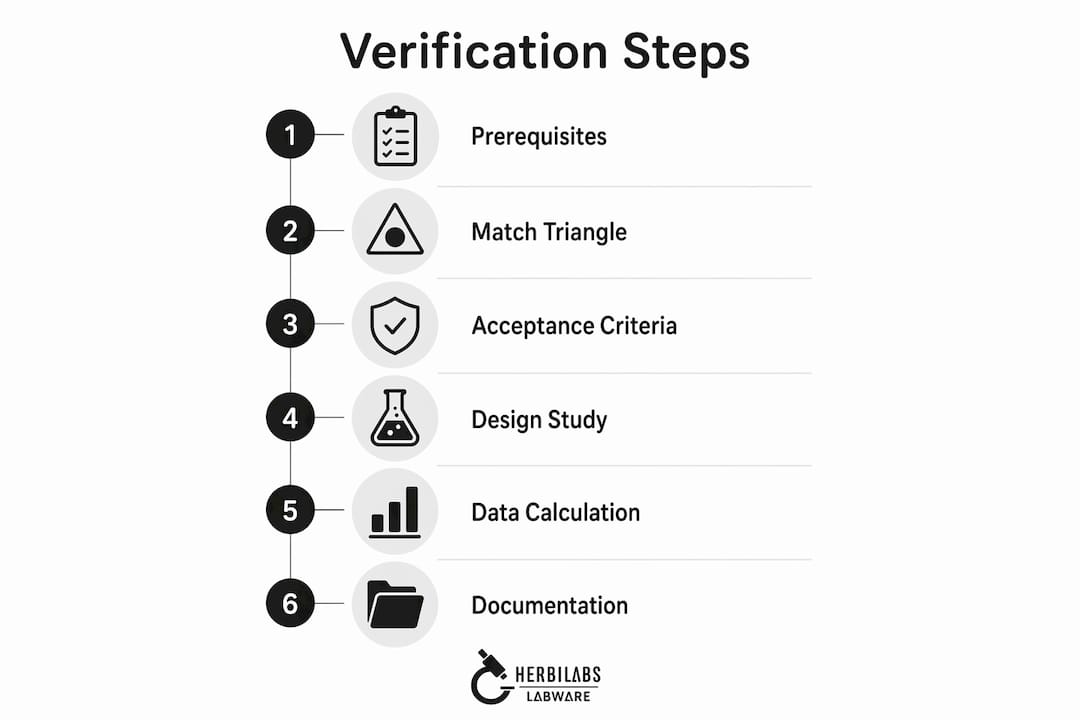
A functioning reagent quality assurance process requires three things before any testing begins: trained personnel, complete documentation, and the right equipment. Missing any one of these creates gaps that invalidate the entire workflow.
Personnel and training form the foundation. Every staff member involved in verification must understand the specific protocol being used, whether that is CLSI EP26 or an in-house equivalent. Competency assessments should be documented and repeated whenever a protocol changes.
Documentation requirements include:
- Purchase Orders (POs) with lot numbers clearly recorded
- Certificates of Analysis (CoAs) from the supplier for each lot
- Standard Operating Procedures (SOPs) covering every verification step
- Instrument calibration and maintenance logs
- Chain of custody records for all samples used in testing
Equipment and software must match the protocol demands. Basic requirements include calibrated analytical instruments, appropriate reference materials, and statistical software. For labs running CLSI EP26, tools like MedCalc support the statistical calculations required by the protocol, including Total Allowable Error and rejection limit computations.
| Prerequisite Category | Specific Requirement |
|---|---|
| Personnel | Documented competency assessment per protocol |
| Documentation | PO, CoA, SOP, calibration logs |
| Equipment | Calibrated instruments, reference standards |
| Software | Statistical tools supporting EP26 calculations |
| Sample availability | Minimum 15–20 patient samples for LTLV |
Pro Tip: Build a pre-verification checklist that confirms all five prerequisite categories are complete before any reagent lot enters testing. A single missing document can invalidate results during an audit.
How do you verify certificates and perform the “match triangle”?
The match triangle is the first physical check in any reagent authentication process. It requires confirming that the lot number on the Purchase Order, the container label, and the Certificate of Analysis are identical. Any mismatch breaks the audit trail and invalidates traceability for that lot.
Once the match triangle passes, verify the issuing laboratory’s accreditation. A CoA carries weight only when the issuing lab holds current ISO/IEC 17025 accreditation and the scope of that accreditation covers the specific analytes or tests listed on the document. Check the accreditation body’s public registry directly rather than relying on the supplier’s word.
Data integrity on the CoA itself must meet the ALCOA+ framework: Attributable, Legible, Contemporaneous, Original, and Accurate, plus Completeness and Consistency. Neglecting ALCOA+ compliance leads to CoAs that fail regulatory audits, as Priya Sharma notes in published guidance on CoA verification. A CoA with corrected values, missing signatures, or inconsistent dates is a red flag regardless of the supplier’s reputation.
Modern authentication tools add another layer of confidence:
- QR codes linked to supplier databases allow instant lot verification
- Blockchain-based CoA systems create tamper-evident records
- Digital audit trails replace paper logs and reduce transcription errors
- Cross-referencing with Safety Data Sheets (SDS) confirms chemical identity
Pro Tip: Never accept a CoA as a PDF attachment without verifying it against the supplier’s online portal. Fraudulent CoAs circulate in the research supply chain, and a portal check takes under two minutes.
What are the step-by-step procedures for lot-to-lot reagent verification?
Lot-to-Lot Reagent Verification (LTLV) is the formal process of comparing a new reagent lot against a previously approved lot to confirm performance equivalence. The CLSI EP26 protocol is the recognized standard for this process in clinical and research laboratories.

Step 1: Define acceptance criteria. Set the Total Allowable Error (TEa) for each analyte. TEa defines the maximum acceptable difference between the new lot and the approved lot. This value typically comes from regulatory guidelines, proficiency testing targets, or clinical decision limits.
Step 2: Calculate the Rejection Limit. EP26 sets the rejection limit at approximately 0.6 times the Critical Difference for the analyte. The Critical Difference accounts for both biological and analytical variation. A statistical power of 0.8 is the recommended minimum, balancing sensitivity to real lot differences against the risk of false rejection.
Step 3: Design the study. Run 15–20 patient samples across at least two control levels using both the approved lot and the new lot simultaneously. Patient samples should span the analytical measurement range to capture performance across clinically relevant concentrations.
Step 4: Calculate Absolute Mean Differences. For each sample, calculate the absolute difference between the new lot result and the approved lot result. Average these differences across all samples. If the Absolute Mean Difference falls below the Rejection Limit, the new lot passes.
Step 5: Interpret and document results. Record all raw data, calculations, and the pass/fail decision in a controlled document. Any lot that fails requires escalation before use.
For labs where full EP26 implementation is not feasible due to cost, instrument time, or expertise constraints, in-house protocols can provide adequate statistical robustness. An in-house protocol must still define TEa, set a rejection limit, and use a sample size large enough to detect clinically meaningful differences. The key is documenting the statistical rationale clearly so the protocol can withstand audit scrutiny.
| EP26 Step | Key Parameter | Typical Value or Source |
|---|---|---|
| Define TEa | Total Allowable Error | Regulatory guidelines or clinical limits |
| Set Rejection Limit | ~0.6x Critical Difference | EP26 calculation |
| Study design | Patient samples | 15–20 samples, 2+ control levels |
| Statistical power | Minimum recommended | 0.8 |
| Decision | Absolute Mean Difference | Must fall below Rejection Limit |
How do you incorporate risk-based approaches into reagent quality assurance?
A risk-based QC approach concentrates verification effort where it matters most. Not every reagent carries the same risk to results. High-risk reagents, those that directly affect critical measurements or have a history of lot variability, require intensive incoming QC. Low-risk reagents, such as general-purpose buffers with wide tolerance ranges, need only basic identity and purity checks.
Classify each reagent by two criteria: impact on product or data quality, and the likelihood of lot-to-lot variation based on supplier history. This produces a simple risk matrix with three tiers.
- High risk: Full LTLV using EP26 or equivalent; incoming QC at every lot change; supplier CAPA review for any failure
- Medium risk: Abbreviated verification with defined acceptance criteria; periodic full LTLV on a scheduled cycle
- Low risk: Identity confirmation, visual inspection, and CoA review only
Building a reagent qualification plan formalizes this structure. The plan defines acceptance criteria for each reagent, specifies the side-by-side testing protocol, lists required supplier documentation, and assigns staff responsibilities. A qualification plan also separates reagent-related failures from process issues, which is critical when troubleshooting unexpected result shifts.
QC specifications must be reviewed at least annually or after any significant supplier or process change. Labs that set QC limits once and never revisit them accumulate risk silently. A reagent that was low-risk two years ago may have moved to a new manufacturing site, changing its variability profile entirely.
Pro Tip: Assign a risk tier to every reagent in your inventory catalog and record it in your LIMS or tracking system. When a supplier notifies you of a manufacturing change, you can immediately identify which reagents need re-evaluation without searching through paper files.
What are common mistakes to avoid in reagent verification workflows?
The most common failure in lab verification procedures is documentation mismatch. A lot number that differs by a single digit between the PO, the label, and the CoA invalidates the entire verification record. Train staff to check all three documents side by side before any testing begins, not after.
Inadequate sample size is the second most frequent error. Running LTLV on fewer than 15 patient samples reduces statistical power below the 0.8 threshold recommended by EP26. The result is a verification study that cannot reliably detect a real lot difference, which defeats the purpose of the process entirely.
“Quality control experts advocate for clear acceptance criteria and pragmatic verification plans rather than overly complex protocols that hinder lab efficiency. The goal is a workflow that is rigorous enough to catch real problems and simple enough that staff actually follow it.”
Side-by-side testing of the new lot against the approved lot is the most reliable way to isolate reagent performance from instrument or process variation. If both lots produce the same unexpected result, the problem is not the reagent. If only the new lot fails, the reagent is the cause. This distinction saves significant investigation time.
Additional pitfalls to address in your workflow:
- Failing to document chain of custody for samples used in verification testing
- Accepting supplier CoAs without checking the issuing lab’s accreditation scope
- Skipping escalation procedures when a lot fails, and using it anyway under time pressure
- Neglecting to update SOPs after protocol changes, leaving staff working from outdated instructions
Non-conformance must trigger a formal escalation path. This means notifying the supplier, initiating a Corrective and Preventive Action (CAPA) request, and quarantining the lot until resolution. Labs that skip this step create liability and erode the integrity of their quality control practices.
Key Takeaways
A structured lab reagent verification workflow, built on CLSI EP26, ALCOA+ data integrity, and risk-based QC tiers, is the most reliable way to protect result accuracy and maintain regulatory compliance.
| Point | Details |
|---|---|
| Match triangle first | Confirm identical lot numbers on the PO, container label, and CoA before any testing. |
| Use EP26 for LTLV | Test 15–20 patient samples and set the rejection limit at ~0.6x the Critical Difference. |
| Apply risk tiers | Assign high, medium, or low risk to each reagent and scale QC intensity accordingly. |
| Review QC specs annually | Update acceptance criteria after supplier changes or at minimum once per year. |
| Document everything | Chain of custody, raw data, and pass/fail decisions must be recorded in controlled documents. |
Why proactive verification beats reactive troubleshooting every time
Working with laboratory reagent management over many years, the pattern I see most often is this: labs invest heavily in verification after something goes wrong. A result shift triggers an investigation, the investigation reveals a lot change that was never properly verified, and suddenly the lab is explaining months of potentially affected results to an accreditation body. That is an expensive lesson.
The labs that avoid this scenario treat verification as a production step, not a compliance checkbox. They build the match triangle check and the LTLV study into the reagent intake process so that no new lot reaches an instrument without a documented pass. The upfront time investment is real, but it is a fraction of the time spent on retrospective investigations.
I also think the field underestimates how much in-house protocols can accomplish. EP26 is the gold standard, but a well-designed in-house protocol with a clear statistical rationale and documented acceptance criteria is defensible in most audit contexts. The key is writing down your reasoning. Auditors accept pragmatic decisions when the logic is transparent.
The continuous improvement piece matters too. A verification workflow that was appropriate two years ago may not fit your current reagent portfolio or supplier base. Schedule a formal review every year, tie it to your QC specification review cycle, and treat it as a living document. Labs that do this catch problems before they become incidents.
— Ragnar
Herbilabs reagents: built for traceable, verified workflows
Researchers who need reagents they can actually verify start with suppliers who make that process straightforward. Herbilabs supplies research-grade reagents with full lot traceability and a Certificate of Analysis for every batch, giving you the documentation the match triangle requires from the moment your order arrives.
Every Herbilabs product is manufactured to strict purity standards, with quality control built into production rather than bolted on afterward. That means fewer lot failures, cleaner CoAs, and less time spent chasing supplier documentation. The Herbilabs team also supports researchers with verification and qualification planning questions directly. Browse the full catalog at the Herbilabs shop and source reagents that are ready for your verification workflow from day one.
FAQ
What is a lab reagent verification workflow?
A lab reagent verification workflow is a structured process that confirms a new reagent lot meets defined performance and quality standards before use in testing. It typically includes documentation checks, lot-to-lot comparison testing, and formal pass/fail decisions recorded in controlled documents.
What is the CLSI EP26 protocol?
CLSI EP26 is the recognized standard for Lot-to-Lot Reagent Verification in laboratory settings. It defines how to calculate Total Allowable Error, set a rejection limit at approximately 0.6 times the Critical Difference, and design a study using 15–20 patient samples with a statistical power of 0.8.
What is the match triangle in reagent authentication?
The match triangle requires that the lot number on the Purchase Order, the container label, and the Certificate of Analysis are all identical. Any mismatch breaks the audit trail and invalidates the reagent for use until the discrepancy is resolved.
How often should QC specifications be reviewed?
QC specifications for reagents should be reviewed at least annually or immediately after a significant supplier or process change. Regular review cycles prevent outdated limits from masking real performance shifts in new reagent lots.
Can small labs use in-house protocols instead of EP26?
Yes. Small labs with limited resources can design in-house LTLV protocols that provide sufficient statistical robustness without the full complexity of EP26. The protocol must still define TEa, set a rejection limit, and document the statistical rationale clearly enough to withstand audit review.